When I was growing up, my Dad used to quote this little poem to us.
Tell me friend, what will it matter, say a hundred years from now? If you owned ten thousand acres, or just one old broken plow?
If you bought your suits in Paris, and your shoes in Italy? Or if your clothes were made from patches as the bed quilts used to be?
Whether you lived in a mansion, with the finest broad looms laid? Did you have a private chauffeur, a butler, cook, and maid?
What if you lived in a cottage, with your health gone on the skids? Out of work and out of money, with three dogs, and seven kids?
Sure, on earth it makes a difference what we've got, and who we know. Whether we are poor and hungry, or just rolling in the dough!
If life down here was only , all there was, and that was it! Then is sure would really matter, to all I must admit!
But there's more to life than living, More for those who will believe. More in store laid up in Heaven, if the Saviour we've received.
Whether we are lost forever, or to Jesus here we bow. This is what will make the difference! A hundred years from now!
I don't know about you, but sometimes, I need to make myself remember what really will matter a hundred years from now. When it comes right down to it, my toddler gets a bigger kick out of me reading her a story than me spending two hours sewing her a pretty dress. My hubby doesn't really care all that much about some little do-dad I spent all afternoon working on, especially if I'm grouchy and tired because of it. And most importantly, my Heavenly Father isn't too terribly worried about my new painted chair as He is about me taking the time to do the things He's asked of me.
I enjoy my projects immensely, but they aren't what matters most in life. It doesn't hurt to be reminded of that every now and then.
Thanks for reading and have a happy weekend! =)
"But seek ye first the kingdom of God, and his righteousness, and all these things shall be added unto you" Matthew 6:33

Friday, July 29, 2011
Thursday, July 28, 2011
Freshen up those pillows!

In a book I was reading recently, one designer said she re-upholstered her furniture every six months. Very few of us will ever have the time or the money for that luxury! However, her point was good, and that was, to keep things looking fresh in your home. It doesn't take a multi-million dollar budget to make that one work! I choose to do it by re-arranging a piece of furniture now and then, moving the decor to different spots, and accent pillows. I am all about my pillows. My hubby has ceased to understand my infatuation with recovering pillows. I have two little black ones on my couch in particular that fall victim most often to my various whims of pillow covering.
They started out with large burlap flowers on the front. That was very scratchy and burlap sheds. After a month or two, I stripped the flowers from the front, and put nice soft cotton flowers on instead.

I liked these pretty well for two or three months. Sadly, the flowers started looking rather flat and not very lovely. Off they came, and now I have these!

The lovely thing about pillows is that anyone can customize them to fit your taste whether you are crafty or sew or not. Plain pillows can be bought for very little money if you aren't so inclined to sew one yourself. I just use hot glue to fancy up the front and it rips right off when I'm tired of looking at it! Trim is often on sale at craft stores and you change up the look however and as often as you please without spending exorbitant amounts of money.

I didn't take pictures while I was doing this, because the idea struck at around 10 at night...not super lighting to take pictures at that time! I just used strips of lace and ruffled ribbon to get the look I wanted. Yes, I realize this is about the eleventh post using ruffled ribbon....I can't help myself, I'm in love with that stuff.
So what is your favorite way to freshen up the look of a room?
"I will say of the Lord, He is my refuge and my fortress: my God; in him will I trust." Psalm 91:2
Linking to:
Freckled Laundry
Simple Home Life
Six Sisters
Be Different Act Normal
Lolly Jane
Tuesday, July 26, 2011
My Wall of White
I love gallery walls. I think they appeal to me, because, as I've mentioned before, I'm a cluttery decorator. If one is good, than four or five should be better! I love to stash things in every spare space, and am constantly making myself take things down. Less is more so they say. A gallery wall on the other hand, I can clutter to my hearts content!
The other day, when I re-painted this mirror and hung it up, all that bare space around it just drove me batty to look at! I immediately started "shopping" through my attic and junk tote looking for things to fill it up the space. I also found a few gems like these frames at Ross. (Seriously love that store! Its like Goodwill without dust, and stinky things! You never know what you'll find!)

A bit of paint turned them into these.


I also found this set of keys at Ross. How nifty are those?!!

These brackets came from the thrift store, and I added glaze to antique them a bit.

They are supposed to be curtain hangers.

I like them as mini shelves, so fiddlesticks on what they are supposed to be! I think it is silly too wrapped around what is "normally" done. My house doesn't need to look like my neighbours, or like it came from a home decor store. I think your home should be a reflection of you, and that means unique in whatever way you would wish it to be.

All the whites aren't exactly the same, some are more creamy and some more grayish.

This sign I painted over top of another that had hung in our old house. It didn't match anything in this house, so I decided just to paint it again with something that did match. I went a little crooked on the top line...might need to go back and fix that.

Each piece got a different finishing touch, some are just distressed with sandpaper. The smaller scrolly frames have a black glaze, the mirror has a brown glaze. The sign and music note have ink on the edges. These small frames I used a black crayon to add a distressed look. Just as a side note, crayon isn't permanent, so don't use it if the piece will be handled a lot.

I still have room to add a few more pieces as I come across them...and I'm sure I will! The more the better after all!

I relied heavily on sticky strips and hooks to hang the lighter weight stuff. I didn't want to mutilate my wall too horribly with holes! Hopefully, one day, I'll find a prettier cover for that air vent.
If you want to see some great gallery wall inspiration, check out this post from Under the Table and Dreaming. Tons of great pictures! I love how they all show a different personality, some are really eclectic, some are modern...some really need to straighten up their pictures! Am I the only one who can't stand to see a crooked frame?! So, what do you think? Are gallery walls only for those who love to clutter?
P.S. Anyone else having problems with Blogger adding in spaces randomly to your posts?? I've edited this thing ten times and it still isn't working!
"Let the words of my mouth, and the meditation of my heart, be acceptable in thy sight, O Lord, my strength, and my redeemer." Psalm 19:14
Linking to:
Home Stories A to Z
Sugar Bee Crafts
Not Just a Housewife
Goodbye City Hello Suburbs
My Girlish Whims
Fabric Bows and More
Organize and Decorate Everything
Sew Much Ado
Someday Crafts
Tea Rose Home
Sew Woodsy
Simple Home Life
Funky Junk Interiors
Tatertots and Jello
Six Sisters
Be Different Act Normal
Lolly Jane
The other day, when I re-painted this mirror and hung it up, all that bare space around it just drove me batty to look at! I immediately started "shopping" through my attic and junk tote looking for things to fill it up the space. I also found a few gems like these frames at Ross. (Seriously love that store! Its like Goodwill without dust, and stinky things! You never know what you'll find!)

A bit of paint turned them into these.


I also found this set of keys at Ross. How nifty are those?!!

These brackets came from the thrift store, and I added glaze to antique them a bit.

They are supposed to be curtain hangers.

I like them as mini shelves, so fiddlesticks on what they are supposed to be! I think it is silly too wrapped around what is "normally" done. My house doesn't need to look like my neighbours, or like it came from a home decor store. I think your home should be a reflection of you, and that means unique in whatever way you would wish it to be.

All the whites aren't exactly the same, some are more creamy and some more grayish.


Each piece got a different finishing touch, some are just distressed with sandpaper. The smaller scrolly frames have a black glaze, the mirror has a brown glaze. The sign and music note have ink on the edges. These small frames I used a black crayon to add a distressed look. Just as a side note, crayon isn't permanent, so don't use it if the piece will be handled a lot.

I still have room to add a few more pieces as I come across them...and I'm sure I will! The more the better after all!

If you want to see some great gallery wall inspiration, check out this post from Under the Table and Dreaming. Tons of great pictures! I love how they all show a different personality, some are really eclectic, some are modern...some really need to straighten up their pictures! Am I the only one who can't stand to see a crooked frame?! So, what do you think? Are gallery walls only for those who love to clutter?
P.S. Anyone else having problems with Blogger adding in spaces randomly to your posts?? I've edited this thing ten times and it still isn't working!
"Let the words of my mouth, and the meditation of my heart, be acceptable in thy sight, O Lord, my strength, and my redeemer." Psalm 19:14
Linking to:
Home Stories A to Z
Sugar Bee Crafts
Not Just a Housewife
Goodbye City Hello Suburbs
My Girlish Whims
Fabric Bows and More
Organize and Decorate Everything
Sew Much Ado
Someday Crafts
Tea Rose Home
Sew Woodsy
Simple Home Life
Funky Junk Interiors
Tatertots and Jello
Six Sisters
Be Different Act Normal
Lolly Jane
Monday, July 25, 2011
Ugly Duckling Monday
Happy Monday! It has been quite rainy lately which has slowed down my latest project just a tad. I don't mind the rain a bit, but I need sun if I'm going to paint outside. While I don't have anything completed just yet, I thought I'd show you a simply amazing piece of art work I purchased today.
You see, it popped into my head this morning that the little lady needed a chalk board in her room. Being my typically impatient self, I pretended the dirty dishes and laundry were invisible, and dashed out in the pouring rain to search for something to use to make one. I found exactly what I needed at my local thrift store. I'm having a hard time deciding if I really want to paint over it though...I mean wouldn't you??

Just kidding, relax! I mean, I am all about country decor, but this is way, waaaaaaaay past that line! I think there might have been a good reason they were selling this for only $6! No offense if geese are your thing, they just aren't mine so much. At any rate, I'm quite confident these geese will like being a chalk board much better! At six dollars for a huge canvas and wood frame, I simply couldn't beat that at any sale at any craft store! I thought it might be fun to hang it in my house and pretend I was going to leave it there when my hubby got home from work....the facial expression would be priceless! =) I'm not that good of a lier, so I don't think I could pull it off without laughing.
I also found some pretty frames in my wanderings over the weekend.

What? Gold and bright purple aren't pretty to you?! They will be very shortly, just wait and see.
I think the sun is starting to peek out from the clouds so I'm off to play with paint!...and maybe the dishes and laundry eventually....maybe.
"The Joy of the Lord is your strength" Numbers 8:10
Thursday, July 21, 2011
ABC art and no-sew banner
I am still working on getting the little lady's room fixed to my liking before little lady #2 arrives. As I've mentioned before, that room is tricky because of the low sloping roof and short walls. Any decor that is put up is within easy reach of little fingers. For this reason, it has to be non-breakable, and light weight so as not to smash the little culprit who might pull it off the wall.
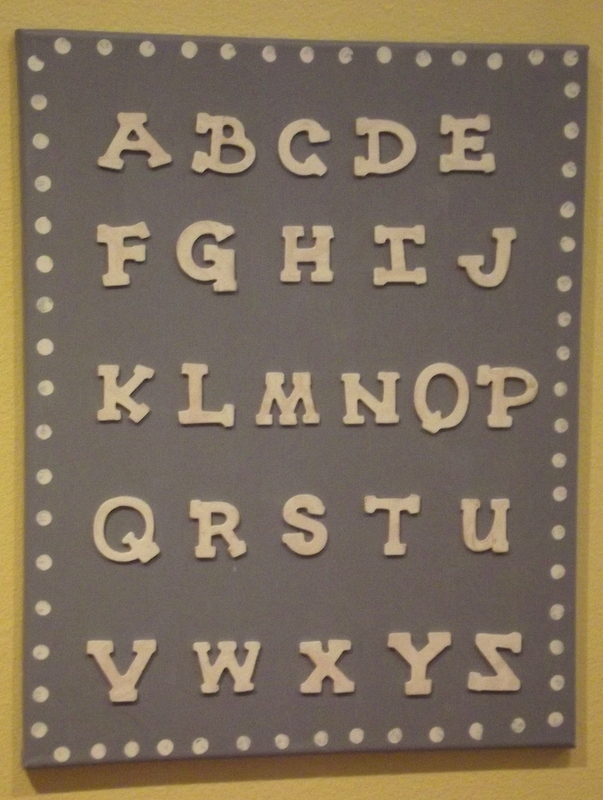
I used a painter's canvas left over from another project, and a pack of wooden letters I picked up at the thrift store for 50 cents to make a simple piece of art for the wall.

I painted the canvas with some blue paint left over from when I painted the toddler bed.

Next, I painted my letters. An easy way to paint small stuff like that is to throw it in a Ziploc with a squirt of paint.

Shake it up, and spill it out to dry.

When it was all dry, I hot glued the letters onto the board. I also added a boarder of white polka dots using a pen cap dipped in paint.

It is pretty simple, but I like it. My hubby informs me that my "Z" is backwards....well lovely. See what pregnancy does to one's brain?! I mean, I've always been a bad speller, but I figured I could handle my ABC's pretty decently! I can read and write, I promise...I even have a driver's license and everything. =)

Total cost for that was about $2.50. The other quick decoration I came up with was this simple felt banner for the toddler bed.

I cut out triangles of pink felt.

I used stencils and fabric paint to put letters on them.

I added some white dots, and hot glued it to a strip of ribbon.

Again, very simple, but adds a bit color and fun to the room.

At least I managed to get the letters right on the banner! =)

I used a painter's canvas left over from another project, and a pack of wooden letters I picked up at the thrift store for 50 cents to make a simple piece of art for the wall.

I painted the canvas with some blue paint left over from when I painted the toddler bed.

Next, I painted my letters. An easy way to paint small stuff like that is to throw it in a Ziploc with a squirt of paint.

Shake it up, and spill it out to dry.

When it was all dry, I hot glued the letters onto the board. I also added a boarder of white polka dots using a pen cap dipped in paint.

It is pretty simple, but I like it. My hubby informs me that my "Z" is backwards....well lovely. See what pregnancy does to one's brain?! I mean, I've always been a bad speller, but I figured I could handle my ABC's pretty decently! I can read and write, I promise...I even have a driver's license and everything. =)
Total cost for that was about $2.50. The other quick decoration I came up with was this simple felt banner for the toddler bed.

I cut out triangles of pink felt.

I used stencils and fabric paint to put letters on them.

I added some white dots, and hot glued it to a strip of ribbon.

Again, very simple, but adds a bit color and fun to the room.

At least I managed to get the letters right on the banner! =)

"Let all your things be done with charity" I Corinthians 16:14
Linking to:
Wednesday, July 20, 2011
New Toy
Guess what?! My super sweet hubby bought me a new camera for my birthday!

I'm having a lovely time learning how to use it! I've been dying to upgrade for quite a while. Isn't he just the best ever?! Hopefully the picture quality on here will drastically improve as I learn.
Happy Wednesday!
"Therefore, my beloved brethren, be ye steadfast, unmovable, always abounding in the work of the Lord, forasmuch as ye know that your labour is not in vain in the Lord." I Corinthians 15: 58
Tuesday, July 19, 2011
smocked maxi skirt tutorial revisited
Do you remember this skirt?

I gave the tutorial for it in this post. I took a look at that tutorial again, and made a few more. However this time I tried it in mini sizes.

It works...right down to a tiny little newborn size!

I tried it with cotton, knit, and seersucker. The knit fabric has less flair to it, obviously, because of the nature of the fabric.

I did find that I liked it better adding 20 inches to the width, rather than 10, like the original tutorial says. Extra fabric isn't too flattering on adult figures, but on little folks, it just makes it cuter. You can see the difference between the pink skirt on the left and the paisley on the right. The pink has the extra width added.

I didn't add the ruffle bit on the bottom of these, but instead sewed ribbon around the edge. Ruffles would be cute too, it is just more time consuming.
If you've not experimented with elastic thread before, you seriously need to! It can get addicting though, I'm warning you!
"The Lord will give strength unto his people; the Lord will bless his people with peace." Psalm29:11
Linking to:
Home Stories A to Z
Sugar Bee Crafts
Not Just a Housewife
Goodbye City Hello Suburbs
Confessions of a Stay at Home Mom
Someday Crafts
Free Pretty Things For You
Tea Rose Home
Fabric Bows and More
My Girlish Whims
Sew Much Ado
Sew Woodsy

I gave the tutorial for it in this post. I took a look at that tutorial again, and made a few more. However this time I tried it in mini sizes.

It works...right down to a tiny little newborn size!

I tried it with cotton, knit, and seersucker. The knit fabric has less flair to it, obviously, because of the nature of the fabric.

I did find that I liked it better adding 20 inches to the width, rather than 10, like the original tutorial says. Extra fabric isn't too flattering on adult figures, but on little folks, it just makes it cuter. You can see the difference between the pink skirt on the left and the paisley on the right. The pink has the extra width added.

I didn't add the ruffle bit on the bottom of these, but instead sewed ribbon around the edge. Ruffles would be cute too, it is just more time consuming.

"The Lord will give strength unto his people; the Lord will bless his people with peace." Psalm29:11
Linking to:
Home Stories A to Z
Sugar Bee Crafts
Not Just a Housewife
Goodbye City Hello Suburbs
Confessions of a Stay at Home Mom
Someday Crafts
Free Pretty Things For You
Tea Rose Home
Fabric Bows and More
My Girlish Whims
Sew Much Ado
Sew Woodsy
Monday, July 18, 2011
Ruffled Pacifier clips

I grabbed some ruffled ribbon from my stash and four clips.

I cut the ribbon 16 inches long.

Hem the ends.

Loop one end through the clip and sew it.

Fold over the other end and put in a snap so that the snap is going through two layers of ribbon.

Put the second snap at the very end so it snaps into a small loop.

Soooo much better than a cheesy store bought one!

"Being confident of this very thing, that he which hath begun a good work in you will perform it until the day of Jesus Christ." Phillippians 1:6
Friday, July 15, 2011
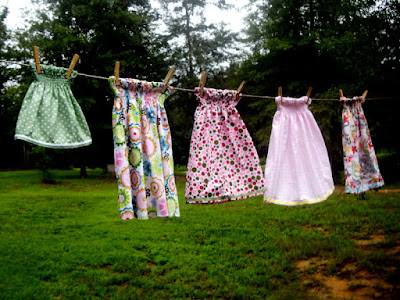
Tie Top Dresses

If you've ever wandered through boutiques, craft shows or Etsy, you have probably have seen a lot of pillowcase dresses. Why do people love them so much? I think it is because, one, they are incredibly easy to sew. With no zippers, buttons, or complicated seems, what is not to love about making them! Now add in the big bows in bright colored ribbon and bright fabric. Any little girl would look adorable packaged up in all that! They are also not extremely size specific. Meaning, one size will fit a long time, especially if the length is generous.
As much as I like pillowcase dresses, I wanted to come up with something different than what I see everywhere else. I played around a bit, and came up with these tie top dresses. They have all the same positives that pillowcase dresses have. They are easy to sew, have no complicated closures, the sky is the limit on fabric and ribbon choice, and they will fit a growing little lady for quite a while.

Want to make one? Here is how. First, cut out your pieces. You will need to cut a front and back skirt part, and four of bib part. Here are the measurements for the sizes I made. These are measured to be about ankle length, so adjust accordingly if you would like shorter dresses.
SIZE BIB SKIRT(width x height) STRAPS ARMHOLE NOTCHES
0-3 5" x 2.5" 15 x 11" 11" 1" x 1"12-18m 7" x 3.5" 21" x 15" 15" 1.5" x 1"
2T 7.5" x 4" 22.5" x 20" 20" 2" x 1"
3T 8" x 4" 24" x 25" 20" 2.5" x 1"
5T 8.5" x 4" 25.5" x 30" 20" 2.5" x 1.5 "
You should have six rectangles of fabric cut out.


Take two of the bib pieces and place them right sides together. Sandwich two or your ribbon straps in between. Make sure that if the ribbon has a right and wrong side it is facing the same direction.

Sew along the two short sides and the long side that has the raw edge of the ribbon on it. Leave the other long side open. Make sure you catch your ribbon as you sew. Flip right side out and sew the bottom closed.

Top stitch along the top, just under the ribbon.

Do the same thing to the other two bib pieces and the other two straps. Sew a gathered stitch along the very top of your skirt pieces.

Gather them to the same length as the bib pieces. Place the skirt pieces right sides together and sew up the sides. Now you will need to hem the arm holes. If you have a serger you can just serge, fold over and sew. Mine, very sadly, is still in the shop so I chose to use hem tape. I folded over the edge just enough to sew, placed a strip of hem tape over top and sewed it down.

Sew a second stitch along the bottom of the hem tape to ensure it lays flat.

Now sew each bib section to the top of the skirt section right sides together.

Flip right side out and top stitch. Make sure to lay the seam on the underside flat as you are sewing. This is to make sure there are no scratchy seams on a little belly.

Hem the bottom and you are all finished!

I added a bit of ruffled ribbon around the bottom just for pretties. You can get creative and use two coordinating fabrics for a different look.

These are super fast to sew, forty five minutes at the most. Once you've done one, they go even faster. They can be quite addicting. I didn't get carried away or anything! It's a good thing I have a lot of nieces!

My little lady just loved hers, she told me it was " a berry tute dress momma! I likey dress!". Well, mission accomplished then I guess! =)

"O the depth of the riches both of the wisdom and knowledge of God!...For of him, and through him, and to him are all things: to whom be glory for ever." Romans 11:33,36
Linking to:
Freckled Laundry
Just a Girl
Iron Violet Designs
Simple Home Life
Sun Scholars
Lolly Jane
Funky Junk Interiors
Tatertots and Jello
six sisters stuff
Michella Marie
Between Naps on the Porch
Running with Glitter
Boogieboard Cottage
Homemaker on a Dime
The Girl Creative
Home Stories A to Z
Sugar Bee Crafts
Not Just a Housewife
Goodbye City Hello Suburbs
Confessions of a Stay at Home Mom
Someday Crafts
Free Pretty Things For You
Tea Rose Home
Fabric Bows and More
My Girlish Whims
Sew Much Ado
Sew Woodsy
Subscribe to:
Posts (Atom)